Reviving Your Ride: Mastering the Art of Car Jump Starts
Whether you’re headed to work, running errands, or embarking on a road trip adventure, a car breakdown can quickly derail your plans. Car jump starts are a valuable skill every driver should have in their arsenal, as they can come to the rescue when your vehicle refuses to start due to a dead battery. In this article, we will guide you through the ins and outs of car jump starts, empowering you with the knowledge and confidence to handle such situations like a pro.
Picture this: you’re rushing to an important meeting when you turn the ignition key, only to be met with silence. The frustration and panic that set in during such difficult moments are understandable. However, understanding the basics of car jump starts can save you from the hassle and expense of calling for roadside assistance. With a few simple steps and the right tools, you can revive your ride and get back on the road in no time. So, grab your jumper cables, put on your problem-solving hat, and let’s dive into the world of car jump starts.
Overview of Car Jump Starts
A car jump start is a lifesaver when your vehicle’s battery dies unexpectedly, leaving you stranded. Whether it’s due to leaving the headlights on overnight or a faulty battery, a jump start can quickly get you back on the road. Car jump starts are a common occurrence and knowing how to perform one safely can save you time, money, and hassle.
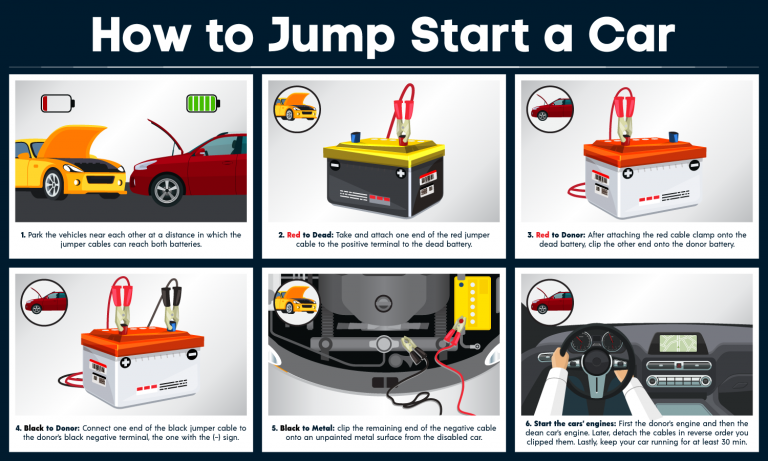
When faced with a car battery that won’t start, it’s important to have the necessary tools and knowledge to perform a jump start. The process involves connecting the dead battery to a functioning one, providing the necessary power to start the engine. This can be done using a set of jumper cables, which are typically color-coded, making it easier to connect the right terminals.
Before attempting a jump start, it’s crucial to assess the situation and ensure your safety. Check for any visible signs of battery damage, such as leaks or corrosion, which may require professional assistance. Additionally, make sure both vehicles are parked in a safe location, away from traffic, to avoid any accidents during the jump start process.
In the next section, we will dive deeper into the step-by-step procedure of performing a car jump start. By following these guidelines, you’ll be equipped with the knowledge needed to revive your ride in case of a dead battery. Remember, always proceed with caution and, if needed, don’t hesitate to seek professional help, such as the reliable services provided by "Rick’s Emergency Roadside Assistance", your trusted partner for 24/7 towing and roadside services in Chicago.
Dealing with Car Lockouts
Getting locked out of your car can be a frustrating and stressful experience. However, with a little know-how and preparation, you can handle this situation with ease. Here are some handy tips to help you deal with car lockouts:
Stay Calm: The first and most important thing to remember when facing a car lockout is to stay calm. Panicking will only make the situation worse. Take a deep breath and focus on finding a solution.
Check for Spare Keys: Always keep a spare key handy in case of emergencies. It’s a good idea to give one to a trusted friend or family member who lives nearby. If you’ve misplaced your main keys, call them and ask if they can bring the spare key to you.
Contact a Professional: If you don’t have access to spare keys or cannot locate them, it’s time to call for professional help. Companies like Rick’s Emergency Roadside Assistance offer 24/7 car lockout services. They have the expertise and tools to safely unlock your car without causing any damage.
Vehicle Jump Start Assistance
Remember, attempting to unlock your car yourself using improvised tools can lead to expensive repairs or even permanent damage. It’s always best to rely on the expertise of trained professionals in such situations.
Essentials of Flat Tire Change
In this section, we will cover the essential steps to successfully change a flat tire. It is important to follow these steps carefully to ensure your safety and the proper installation of the spare tire.
Firstly, start by finding a safe location to park your vehicle away from traffic. Turn on your hazard lights to alert other drivers of your presence. Once you have found a secure spot, engage the parking brake to prevent any unexpected movement.
Next, retrieve the necessary tools from your car’s trunk or designated storage area. These tools typically include a jack, lug wrench, and spare tire. It is crucial to familiarize yourself with the location of these tools beforehand, as they may vary depending on the vehicle model.
Once you have the tools, locate the flat tire and position the jack in the correct lifting point area as indicated in your vehicle’s manual. Begin raising the vehicle using the jack until the flat tire is slightly off the ground, ensuring stability by making sure the jack is securely in place.
With the vehicle lifted, use the lug wrench to loosen the lug nuts on the flat tire, but do not fully remove them at this point. Turning the wrench counterclockwise will loosen the lug nuts. This preliminary loosening will make the removal process easier once the vehicle is fully lifted.
Now, raise the vehicle further using the jack until the flat tire is completely off the ground. With the flat tire off the ground, proceed to fully remove the previously loosened lug nuts. Set the lug nuts aside in a safe place to avoid misplacing them.
Next, carefully remove the flat tire by gripping it firmly and pulling it straight towards you. Be cautious as the tire may be heavier than expected. Once the flat tire is removed, place it aside and retrieve the spare tire.
Line up the spare tire with the wheel bolts and push gently to ensure it is aligned correctly. Take the previously set aside lug nuts and tighten them by hand, ensuring they are secure before using the lug wrench to fully tighten them.
After the lug nuts are securely tightened, lower the vehicle gradually using the jack until the spare tire touches the ground. At this point, use the lug wrench to fully tighten the lug nuts in a clockwise direction. It is recommended to tighten them in a star or crisscross pattern to ensure even tightening.
Finally, once all lug nuts are firmly tightened, carefully lower the vehicle completely to the ground. Double-check each lug nut to confirm they are tightly secured. With the spare tire successfully installed, you can now safely resume your journey.
Remember, if you are unsure about any of these steps or find yourself in an unsafe situation, it is always best to contact a professional roadside assistance service like "Rick’s Emergency Roadside Assistance" for reliable and efficient help.


